

TABLE OF CONTENTS
- How to Generate SSH Keys on Windows using PuTTY Download
- How to Generate SSH Keys on Mac OS X & Linux
- What is SSH and Why do I need it?
How to Generate SSH Keys on Windows using PuTTY Download
In order to Generate an SSH Key on Windows, you will need to download PuTTY. PuTTY is a free SSH and telnet client for Windows.
PuTTYgen is a robust SSH key pair generation tool that comes via PuTTY Download that will help you to generate an SSH-2 RSA key pair. This is the type of SSH key needed to access a SkySilk VPS with SSH.
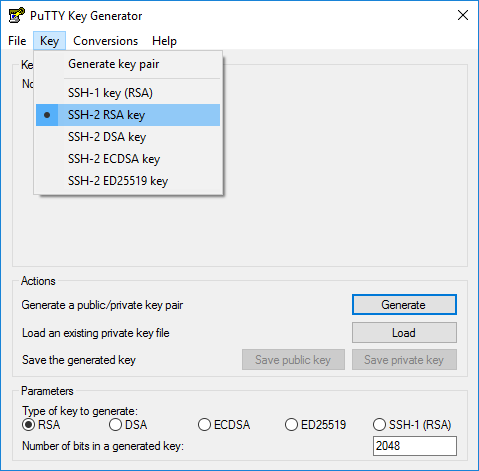
Be sure to Save your private key!
If you're using putty, you'll need to specify the private key when you're logging in, as follows:
1. In the putty connection configuration screen, expand Connection -> SSH -> Auth

2. Click the Browse button, and select your previously-created private key
3. Return to the Session Category. Name and save the session for easy future access.
4. Login to your SkySilk VM now that your SSH key has been configured.
How to Login to Your SkySilk VM
How to Generate SSH Keys on Mac OS X & Linux
1. Search for and Launch the Terminal app.
2. Enter the following code and press enter:
ssh-keygen -t rsa3. Press ENTER to store the key in the default folder /Users/Username/.ssh/id_rsa).
4. Type a passphrase (characters will not appear in Terminal).
5. Confirm your passphrase to finish SSH Keygen. You should get an output that looks something like this:
Your identification has been saved in /Users/myname/.ssh/id_rsa.
Your public key has been saved in /Users/myname/.ssh/id_rsa.pub.
The key fingerprint is:
ae:89:72:0b:85:da:5a:f4:7c:1f:c2:43:fd:c6:44:30 [email protected]
The key's randomart image is:
+--[ RSA 2048]----+
|                 |
|         .       |
|        E .      |
|   .   . o       |
|  o . . S .      |
| + + o . +       |
|. + o = o +      |
| o...o * o       |
|.  oo.o .        |
+-----------------+
6. Copy your public SSH Key to your clipboard using the following code:
pbcopy < ~/.ssh/id_rsa.pub7. Use ctrl+v or right-click and paste to paste your public SSH Key where it needs to go!
8. Login to your SkySilk VM now that your SSH key has been configured.
How to Login to Your SkySilk VM
NEVER SHARE YOUR PRIVATE SSH KEY WITH ANYONE!
What is SSH and Why do I need it?
The need to facilitate secure communication between system operators and their respective system led to the development of SSH or Secure Shell. SSH works on the premise of challenge-response ("lock" and "key") using public and private hash values. A user installs the private key into a private location in their user directory and presents the public key any time a console session is established. The necessary tools to generate SSH keys are already preset and virtually every modern Unix-like operating system, including Linux and MacOS X. On Windows, puttygen does the job.
The public key will always follow the following syntax:
ssh-rsa
[hash value]
== rsa-key-[date code]
where the hash value would be the length of the cipher strength chosen at generation, usually 2048bit. That WHOLE string is what you copy into your ssh key field during VM generation. The PRIVATE key you have generated should be saved securely on your computer because it is the only credential necessary to log in to the machine; if it is compromised it can be used to gain root access to your machine which isn't good!
How to Login to Your SkySilk VM